Tuesday, April 5, 2011

Nesting with No Nursery... Part 2


This is something that I've been wanting to make since I saw it on a crafting blog (How Does She) about 6 months ago. I told myself that I would do it before Matthew's 2nd birthday, so that I could start measuring his height every year. Well, that deadline was fast approaching so I thought I'd better get to it! And while I was at it, I made one for the baby too even though I probably won't be measuring her height for quite some time. I took pictures as I went so if any of you crafty people out there want to try it you can! I made both of mine while Matthew took his nap this afternoon, so in about 2 hours. One of the things I like about it is that you can take it with you, so when we move again in the future we won't leave behind the measured marks on a door frame or wall never to be seen again.

Supplies you'll need:
  •  3" wide x 1"deep MDF board cut in half. The boards come in 10 or 12 foot lengths, so I just had the guy at Home Depot cut in half for me, and then I had two! Perfect for making two charts :o)
  • Wooden topper
  • Acrylic paint
  • Tape measure
  • Ruler or straight edge
  • Pencil
  • Permanent marker
  • Numbers 1-6 in vinyl
  • "Watch Me Grow" phrase in vinyl
First I made the decorative topper. You can use a square board and put a vinyl design on it, or you can use ready-made wood cut-outs. I opted for the ready-made option and bought my wooden toppers at Michaels for 99 cents each. Then I painted them with acrylic paint.


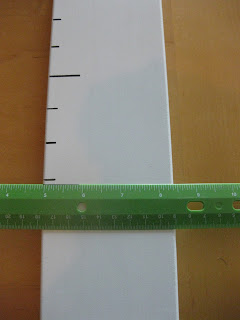
The next step is to mark the measurements on the MDF board. Now keep in mind that the growth chart will not start from the ground up - it will be about 10 inches off the floor. This is so if you have baseboards it will still be able to hang flat, and it also allows you to get more height on the chart. I did my measurements by placing the topper where I thought I'd like it, leaving space for the "Watch Me Grow" phrase, and then starting with my highest measurement. My charts go up to 6' 2", but you can make yours go taller or shorter depending on the height in your family. I am slightly anal and didn't want to mess up, so I used a pencil to make all of my marks first. I used the tape measure and just marked inch increments. At this point I didn't worry about where the numbers would go, I just marked all the way down the board.

Once I had marked all the way down, I went back with a black permanent marker and a straight edge. I made the lines that showed a foot longer than the other inch marks. I also counted as I went to make sure that my measurements were going to be accurate!


I have a Silhouette machine, so I used it to cut out the numbers and words from vinyl. I made the numbers about 2 inches high, and the entire "Watch Me Grow" phrase was 3 inches wide and 4 inches tall. If you don't have a Silhouette machine you can hand write everything, or you can visit my crafting site www.cupcakesandjellybeans.com and order just the vinyl to put on your growth chart.  Place the numbers directly next to the longer lines and the phrase at the top! The font I used for the train chart is called "A Little Pot" and the font for the butterfly chart is "Rolina".


The last step is to glue on your topper! I did this last in case I ended up needing to move it up or down to make more room for the numbers or phrase. Use wood glue and just stick it on!


The last step is to put a picture hanger on the back! You can buy one at Home Depot, or if you're like me you have random things around your house and already own one. Just hammer it into the back once your wood glue is dry, and you're all done. Now all you have to do is hang it on the wall! But don't forget to measure from the ground to the 1 foot mark to make sure your measurements are accurate when you hang it!


Saturday, April 2, 2011

Nesting with No Nursery... Part 1

Since I have no nursery to decorate, I've been making things for our baby's future nursery and for Matthew as well. Last week I made this super cute hair bow holder! I also thought it would be fun to include a step by step for how I did it, in case any of you other creative people out there want to make your own.


I was originally planning on buying a cheap, open frame for this project (since you paint it anyway) but I stumbled upon this 12"x18" shadow box in the "As Is" section at Michaels one day and thought it would be perfect! I think it was in there because the glass had broken and was gone, but I didn't need the glass anyway. It only cost me $6.00! It's hard to tell in the picture, but the frame stands out about 3 inches from the back, and the background was made as a pegboard or corkboard covered in fabric.

The first thing I did was remove the back from the frame and paint the frame brown to match my fabric. Ideally I would have used spray paint, but since I have no garage or driveway, I just used regular acrylic paint. You could use leftover paint you have in your garage as well.


While the frame was drying I made the inside. I laid the frame insert on top of a piece of corkboard and used box cutters to cut out a section that was the exact same size. Since it has to fit in the frame, it is very important that it's exactly the same size. (I forgot to take a picture of that step!) Since the shadow box I bought was already made out of corkboard, I only used one thin piece. If you are using an open frame or a regular frame, you will want to cut two pieces of corkboard and hot glue them together to make it thicker.

Then I laid out my fabric, put the piece of corkboard on top of it, and cut out a section of fabric that was three inches wider on each side. To cover the corkboard I folded the fabric over the edges and secured it with pins. It is very important to pull the fabric tight and make sure the pattern is straight on the other side, so the pins give you a little flexibility if you need to make adjustments.


To permanently fasten the fabric you can use either a staple gun or (if you're like me and don't own a staple gun) hot glue. Just make sure that the fabric stays pulled tight while you glue. Once the fabric was in place, I put the newly covered corkboard and the original frame backing back into the frame!


This is now a cute decorative pegboard that you could really use for anything. I decided to make mine into a hair bow holder, so here's what I did next! I had been looking for some cute, coordinating pins to use but hadn't found anything that thrilled me. Then I realized I can make my own! I had some old, flat tacks in a drawer that I used as a base. Then I went through my crafting supplies and found some things that I could glue to them. I made two bows, a flower, and two jeweled pins.


To actually hang the hair bows in the frame, I used three strips of ribbon that the bows can be clipped to. Right now I just have three ribbons, but as I accumulate more bows I can add, change, and move the ribbons around as needed. That's the beauty of the corkboard! I didn't need to two pins with bows yet, so I just used them as a decoration in the corner for now.


Clip on your hair bows, and voila! Cute hair bow holder! Unfortunately mine is now sitting in a closet until we move and I can hang it in the baby's nursery. One other thing I am planning to add is her first initial either in the bottom corner where the bows are or at the top in the center. Since she doesn't have a name (and won't until she's born) this will have to wait a bit.


All in all this project cost me $8.00 for the frame and corkboard. The rest of the supplies I already had at home. I hope you enjoyed my post, and maybe I've inspired you to make something as well! If so, leave a comment and link below so I can see your cute ideas!

Thursday, March 31, 2011

Matthew at 22 months


I recently bought a book called "One Line a Day" where you write down one thing you want to remember for each day. I love it, because I felt like Matthew was learning and doing all sorts of new things, and didn't want to forget them. Plus, writing one thing for every day is totally doable as far as time goes. I was looking back over some of the things from the past month, and thought I'd blog about them!

At 22 months, Matthew...

...loves: Thomas the Train! He wakes up asking about him, mentions him countless times throughout the day, and  carries around these two Thomas bath toys I bought him at a consignment sale. They come with us to bath time, bed time, meals, errands, outside, child care, basically everywhere. They are actually in the picture above! He also loves cars, trucks, fire trucks, basically anything with wheels. Recently he has decided it's fun to try to carry as many things as possible at one time. This morning he was carrying around two trains, a cell phone, his stuffed doggie, and a blankie. He also tried to fit all 10 jumbo crayons and 4 regular sized crayons into his hand while coloring today.

...says: everything we do! He is quite the little parrot and copies two or three words from every sentence that we say. One of my recent favorites came when we were outside with Cajun and Brian told Cajun to go poop in the ivy. Then Matthew kept repeating "poop, ivy". Gotta love the bathroom humor already! He likes pointing out things and telling you what they are over and over again until you repeat the word back to him. I guess he wants us to acknowledge that he's saying the right word! When we can't figure out what he's saying, he gets very frustrated and upset (I wonder where he gets that from...). He has also created two of his own words. "Shada" means any kind of truck, and "Fwee" means sip. We have no idea how he got these two words from the actual word, but we think it's hilarious! In fact, the poor kid will probably think fire trucks are actually called shadas, because that's how we refer to them now!

...sleeps: like a champ! He goes to bed at 8:00 and wakes up around 7:30 every day. He also still takes a great afternoon nap. I've started putting him down at 1:30 instead of 1:00 because he doesn't seem tired yet, and most days he sleeps until 4:30. He also goes to bed without his paci now! I think he's substituted it for toys that he likes to take to bed with him, but that's fine with me. He has recently started crying when we put him down, because I think he'd rather keep playing than sleep, but it only lasts a minute or two. He also asks for stories before nap and bed time now, and has already tried coaxing one more out of us when we tell him that it's time for bed!

...eats: pretty much everything we give him. He loves fruit, but is not such a fan of vegetables. I have found the best way to get him to eat his veggies is in vegetable soup or chili, or by sprinkling cinnamon on them if they're just plain. He knows the words for breakfast, lunch, and dinner, and when I tell him it's time to eat he runs to his chair and repeats whatever meal it is. He also likes to ask for a snack and milk or juice in his cup throughout the day.

...has learned: his numbers 1-10, several letters, and most shapes. Most of these things he learned on his own, and surprised us when he randomly started identifying them! The teacher in me feels like I should start working with him to learn the rest! He also can distinguish between all types of vehicles (car, truck, bus, fire truck, bike, motorcycle, airplane, helicopter) and points them out whenever he sees them. He knows his colors, animals and their sounds, and the characters on his favorite shows! (Thomas, Percy, Elmo, Cookie Monster, and Big Bird are his favorites.)

...has grown a lot! He currently wears size 2T in clothing, is around 35 pounds and about 3 feet tall.

...has his own personality! He already knows how to cut his eyes when he's about to do something he shouldn't, and has a mischievous face that he uses a little too frequently if you ask me! He definitely has his share of temper tantrums when things don't go his way, but they have gotten a lot less frequent recently. I think he realized that we ignore him and screaming isn't getting him anywhere. He loves wrestling with Daddy and being tickled, and laughs and squeals with delight while they play. He is also very loving, giving kisses and hugs, and on occasion asking for them. Another of his favorite things is "uppies" and being carried and held. I think he may know that things are about to change and as a result is becoming a little clingy. I can't say I mind the snuggling though!

All in all he is a happy, healthy boy and we love him to bits! We can't wait to see him with his new baby sister in a few weeks!

Monday, March 14, 2011

Return of the Coupon Queen

When I started working part time a year and a half ago I learned how to coupon in order to save money on our tight budget. It's amazing the kind of high you can get when you save as much as you spend on groceries! In Winston-Salem I looked forward to double and triple coupon weeks at Harris Teeter, where I could get tons of stuff for free or under a dollar. When we moved to Atlanta it was a little harder to save that much, because Publix only doubles coupons 50 cents or less and never triples. I still only spend an average of $60 per trip to the grocery store and go about every other week, which I feel is pretty darn good! It also helped that I started getting our produce at Costco every other week or so. One part of couponing that I've not enjoyed, but that you can save a lot of money doing, is drug store couponing. It seemed that every time I would get organized to go they would be out of one or more of the things I was planning to buy, which resulted in me not being able to get the deals I planned on (to coupon at drugstores you have to check out with multiple transactions and use their store dollars in each one to save the most money, so if one is gone you're SOL!) and leaving empty-handed or spending more than I intended. Talk about frustrating! So as a result of this I had been a lot less motivated to coupon lately. But...

This past week I got some really awesome deals with coupons and renewed my motivation! Here's what I got:

CVS Trip: 2 bottles of shampoo, 2 large tubes of toothpaste, laundry detergent
Total value: $27.65
I paid: $4.16
Savings: 85%

Publix groceries: 2 large boxes of diapers, strawberries, 4 lunchables, 1 lb deli meat, 3 pkgs shredded cheese, 5 boxes cereal, butter, cottage cheese, sour cream, 3 tomatoes, 1 green pepper, cilantro, 2 loaves of bread, 2 boxes graham crackers, 2 boxes corn bread mix, 3 packages Steamfresh frozen vegetables, 2 Yoplait smoothies, 2 boxes frozen pancakes, box of dishwasher detergent, roll of paper towels, mandarin oranges, canned pineapple, bottle cranberry juice, 2 bottles V8 Splash juice, 2 4packs of YoPlus yogurt, butter, peanut butter, jar of pickles, tortillas, ketchup, and A $50 GAS CARD!
Total value: $223.69 (without gas card $173.69)
I paid: $137.18 (without gas card $97.18)
Savings: 39% (without gas card 44%)

Target: Swiffer Wet Jet starter kit, Swiffer Wet Jet refills, 2 bottles of Pledge furniture cleaner, toddler toothpaste
Total value: $40.02
I paid: $15.87
Savings: 60%

Overall for the week
Total value: $291.36
I paid: $157.21
Savings: 46%

This is actually a little more than I normally spend in a week, but I did get $50 in gas, 2 boxes of diapers, several cleaning supplies, and toiletries in addition to all of my groceries. People often ask me if I end up buying things I wouldn't normally buy using coupons, or if the only food I get is processed. The answer to both questions is no! As you can see by my groceries most items are things that everyone buys at some point in time, and I plan my dinners around what I'm going to be able to get cheaply at the store that week. Hardly anything is processed, and couponing has actually made me try a lot of different things that I normally wouldn't! Frosted Mini Wheats are now my favorite cereal, which I never would have tried were it not for coupons. People also assume that store brands are cheaper, but when you line up coupons and sales correctly the national brands are much better deals. I still buy a store brand if I need something that isn't on sale or I don't have a coupon for, but those items are few and far between. As far as toiletries and things go, when we are running low on something I just keep my eye out for good deals and buy a few at a low price. A lot of times I have one or two extras of something on hand because I could get them so cheap, and this also eliminates having to buy something for full price because we ran out of it.

Anyway, just thought I'd share my thoughts on couponing for the week! When you're living on a budget it's a great way to save money. And it's kind of fun to give yourself a spending goal for the month and try to beat it with coupons. Happy couponing!

Tuesday, March 1, 2011

Matthew Loves Numbers!

It's amazing what Matthew picks up without me realizing it. A few weeks ago we were playing with his shape sorter, and all of sudden he started picking up the shapes and saying numbers. Sure enough, each shape had a different number on it and he knew them all! I decided to see if he could identify numbers that I wrote on the Magnadoodle and sure enough he did. He knows 2-10, but for some reason has a hard time with the number 1! He can show you one with his finger, but he doesn't like to say it. Now he points out numbers wherever we go - from price stickers in the store, to the channel number on the tv, to our apartment numbers - everywhere! Here is a video of him saying some of his numbers.

Monday, February 21, 2011

Helicopter Tour

For Christmas I got Brian a 2-person helicopter tour of downtown Atlanta, and we went on Saturday. It was awesome! It just seemed like we were floating above downtown. I'm not too keen on flying in small planes (and the smallest one I've been in still seats about 30 people) but for some reason flying in a helicopter didn't scare me. But, as my husband so kindly pointed out minutes before takeoff, it is apparently more dangerous to fly in a helicopter than a plane. Well, we survived! While I did have to fend off thoughts of us leaving Matthew parentless if something bad happened, it was quite an enjoyable experience! Here are some pictures and videos from in the air.


Tuesday, February 1, 2011

Balloon Boy

Think we could get famous by broadcasting these videos?